How to Make Plane Drawer Fronts
A manus built wall cabinet

Words and photos: State of israel Martin
Illustration: Graham Sands
My design process begins on newspaper with a crude sketch of the main features I want – the number of drawers, doors, spaces, not too much, and I also like to draw some of the details. After deciding on the measurements I then jump into the real thing. Because I use only hand tools I don't like doing mock- ups, and try to piece of work with the real slice right from the commencement. I demand to see the book of the piece to figure out how it looks with the wood I've chosen.
Working past hand
I start by dimensioning by hand the principal pieces of the structure. Ane face of the rough board is made flat, normally with a jack plane, unless information technology is a very uneven piece, in which case I'll get-go with the scrub plane. I then marker the thickness on that board with a marking gauge and plane to the knife line. That is the hardest part of all, merely too the 1 that helps me feel the wood.
After the all the wood for the principal structure is prepared I start on the joinery for the carcase then I tin can get a feeling for the overall dimensions of the piece. I piece of work on the rest of the elements the same mode. That way for me, working everything by manus, information technology's much more fun than if I dimension all the pieces showtime and and then exercise all the joinery. In this way I can also make adjustments to the projection every bit I work on information technology.

Because I piece of work lonely and by hand another affair I do is to await for off-cuts of past piece of work and so I don't have to prepare everything from scratch. Unremarkably that'southward what I exercise for internal parts such every bit drawer guides, grit panels, drawer sides and sometimes fifty-fifty for seen components such as drawer fronts.
Making this cabinet was most spaces, colour and grain. I wanted to utilize some of the off-cuts I already had, such equally the Douglas fir drawer fronts and the English language yew pocket-sized side drawer.
Gluing up the panels

I used quartersawn Castilian chestnut for the carcase. I like working with chestnut because it is a actually manus tool friendly wood, then sawing and planing goes really smoothly. 2 bookmatched boards were sawn (photo i), planed, spring jointed and glued upwardly to get the desired width.

After removing them from the clamps I had to dimension them again so they were perfectly flat (photo two). Because the boards were bookmatched the grain management changes on the panels, so I had to plane in two directions and carefully in the middle to avoid tear-out.
Cutting dovetails

The carcase was joined with through dovetails. I marked the tails and sawed to the line. I similar to use a marking pocketknife instead of a pencil to mark the tails as well, because if I don't saw them completely square I tin easily suit them to the mark knife left. I pare the shoulders with chisels so transfer the tails to mark the pins. I saw a bit inside the lines and so skin to the lines to become crisp joints with no gaps earlier a examination fit (photo 3).

With the iv carcase pieces done I accept the real internal measurements for the shelves. After preparing the shelf fabric I used a router airplane to cut dados (photograph 4) and rebates, considering the piece is not too wide and they are much faster to cut than sliding dovetails. Photo 5 beneath shows the first carcase dry out fit.

Side drawer guide
Normally when I make side drawers all the within guides, runners and kickers are hidden inside the carcase. In this instance I had to make a minor one-half instance to hide those pieces, otherwise they would exist visible from the outside.

A 'pigsty' was first made for the drawer as if for a broad through mortise, just in this case the 4 inner sides were made completely polish (photo vi).


Dados and rebates were cut into the side and main carcase divider to firm the side drawer guide. The side and bottom pieces were rebated on 1 edge and the sides glued. These are as well rebated on their ends to fit into a rebate on the principal carcase (photos 7, 8, 9).

There is no trouble with wood movement considering the pieces are narrow. The guides, runners and kickers were then made then I could perfectly fit the drawer inside (photo 10).

After making this side drawer instance. I glued upwardly the carcase pieces (photo 11).
Making the drawers
The front drawers are made with directly grain Douglas fir fronts and maple sides. I used American walnut for the door console and a small-scale piece of English language yew for the side drawer front end.
The drawer fronts were first fabricated to fit tightly in position and the sides and backs then made a bit oversize equally their length would be adapted afterwards on. When making dovetails I always starting time outset with the tails – I only mark them and saw without further aligning if they are nice and straight. I transfer the markings to get the pins, then remove the waist and adjust them with chisels.

I learnt how to join the backs for the drawers from Garrett Hack. Sliding dovetails are very strong and space for woods move can be left at the base. This likewise allows me to pull out the drawer and run across everything inside without pulling it out all the style (photo 12).
The tenon of the sliding dovetail is made with a dovetail plane. The mortise role is made with chisels and a small router plane removed the waste. The sides are finished with a wide chisel and a shopmade dovetail guide.

So once they are glued upwardly, I finished adjusting them in identify, planing their sides fiddling by little until they fitted smoothly. I similar to utilise quartersawn cherry cedar for my drawer bottoms and cabinet backs, because of its directly grain, stability and ease to work with the saw (photo thirteen).
The simply challenge I find with ruby cedar is getting a mirror polish on it with the paw airplane. I utilize a depression angle airplane with a low angle (and most importantly) very abrupt blade sharpened at least to ten,000 grit. And I sharpen information technology very often because red cedar dulls your bract very rapidly.
The drawer lesser sides are chamfered and fit into 4mm side and front grooves. Later on making them I plane smooth the down side of all the bottoms.
The door
The door is fabricated from quartersawn chestnut with the sides and stiles bookmatched (photo 14). The joinery is haunched mortise and tenons and the panel is rebated on all sides to fit into the stile grooves.

I ever drill the mortises in the stiles first with a paw brace with a drill flake that is about 1mm narrower than the mortise (photo 15), then arrange with chisels.

I bank check the mortises are square to brand sure there is no problem afterward with the tenons. I unremarkably make the tenons at one terminate and and so measure from reality for the tenons on the other (photo 16).
The tenons are sawn almost to the gauge line and and so finished with the router plane in order to get the ii tenon faces perfectly parallel to the stile faces. Only a few adjustments are and then needed with a bladder to fit them perfectly in their tenons. Afterward the door is made I check it with winding sticks.
A dainty piece of bookmatched walnut was used for the door console and adds interest to the piece while contrasting with the direct grain elsewhere. After the door is glued upwards, it was fitted with contumely hinges, offset to the door, and then to the carcase. Small adjustments achieve a perfect fit.
The back

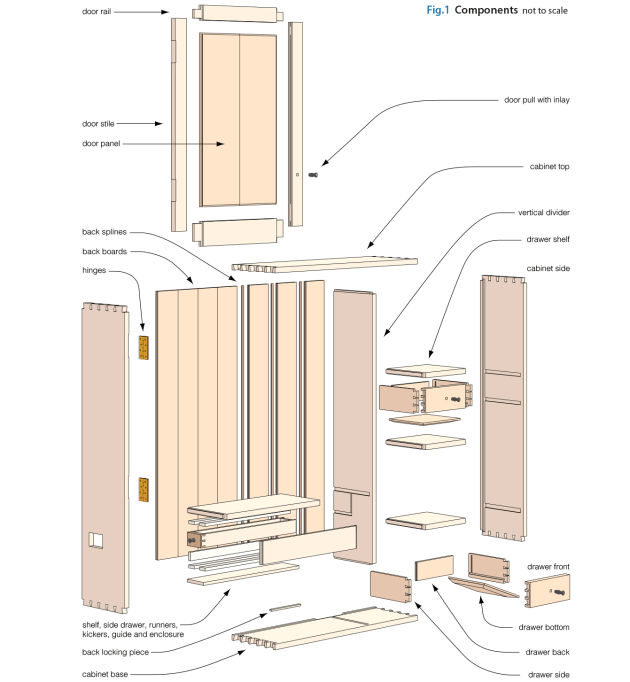
The dorsum boards sit in grooves (photo 17) however the lesser carcase groove is rebated on a small section then the boards tin slide in and so move to the sides (see fig.i), before a locking slice is inserted. In this manner all but i of the boards are completely surrounded past grooves.

The dorsum is as well made from red cedar panels joined with mahogany splines (photo 18). The splines are glued to one console and without glue on the other, like a natural language and groove joint. Each board is individually fitted so the gaps between them are even.
Finishing
After the commencement few coats of thin shellac I used pumice to fill the grain before applying some other 9–10 coats so plumbing equipment the pulls. The pulls are the near hard parts for me to design as they can make a piece, or destroy information technology. The size, the colour, how they are fastened – everything has to exist taken into account.

Here I made modest Shaker fashion pulls and this is the only time I used a machine, a modest lathe. I used African blackwood and finished them with steel wool and wax while they were on the lathe. They are fitted with contrasting holly wedges. A pocket-size circumvolve of abalone was inlayed into the door pull.
My conclusion to work only with hand tools has to practise with enjoying their operation and precision, and also reflects my frustration with low price machines. Also, given that my workshop is next door to my home, using hand tools allows me to work at any time of the solar day I choose.
Israel Martin lives in Cantabria in northern Kingdom of spain, works to commission and teaches manus tool woodworking. Apart from some short workshops with Garrett Hack he is self taught and honed his skills building his ain workshop, workbench and some of his tools.
Source: https://www.woodreview.com.au/how-to/a-hand-built-wall-cabinet
0 Response to "How to Make Plane Drawer Fronts"
Post a Comment